Adding Plugins
Plugins are custom, user-built plays that define what gets installed and configured on each machine during the build. A Domain Controller plugin installs Active Directory, a vulnerability plugin plants an exploitable service, a file copy plugin moves files onto the machine — and so on.
Entering Machine Edit Mode
Section titled “Entering Machine Edit Mode”To manage plugins on a machine, double-click the machine node on the canvas. This enters machine edit mode, where:
- The left sidebar switches to show plugin categories
- The main panel shows the machine’s current plugin list (the build sequence)
- You can drag plugins from the sidebar into the build sequence
Plugin Categories
Section titled “Plugin Categories”Plugins are organized into categories in the sidebar:
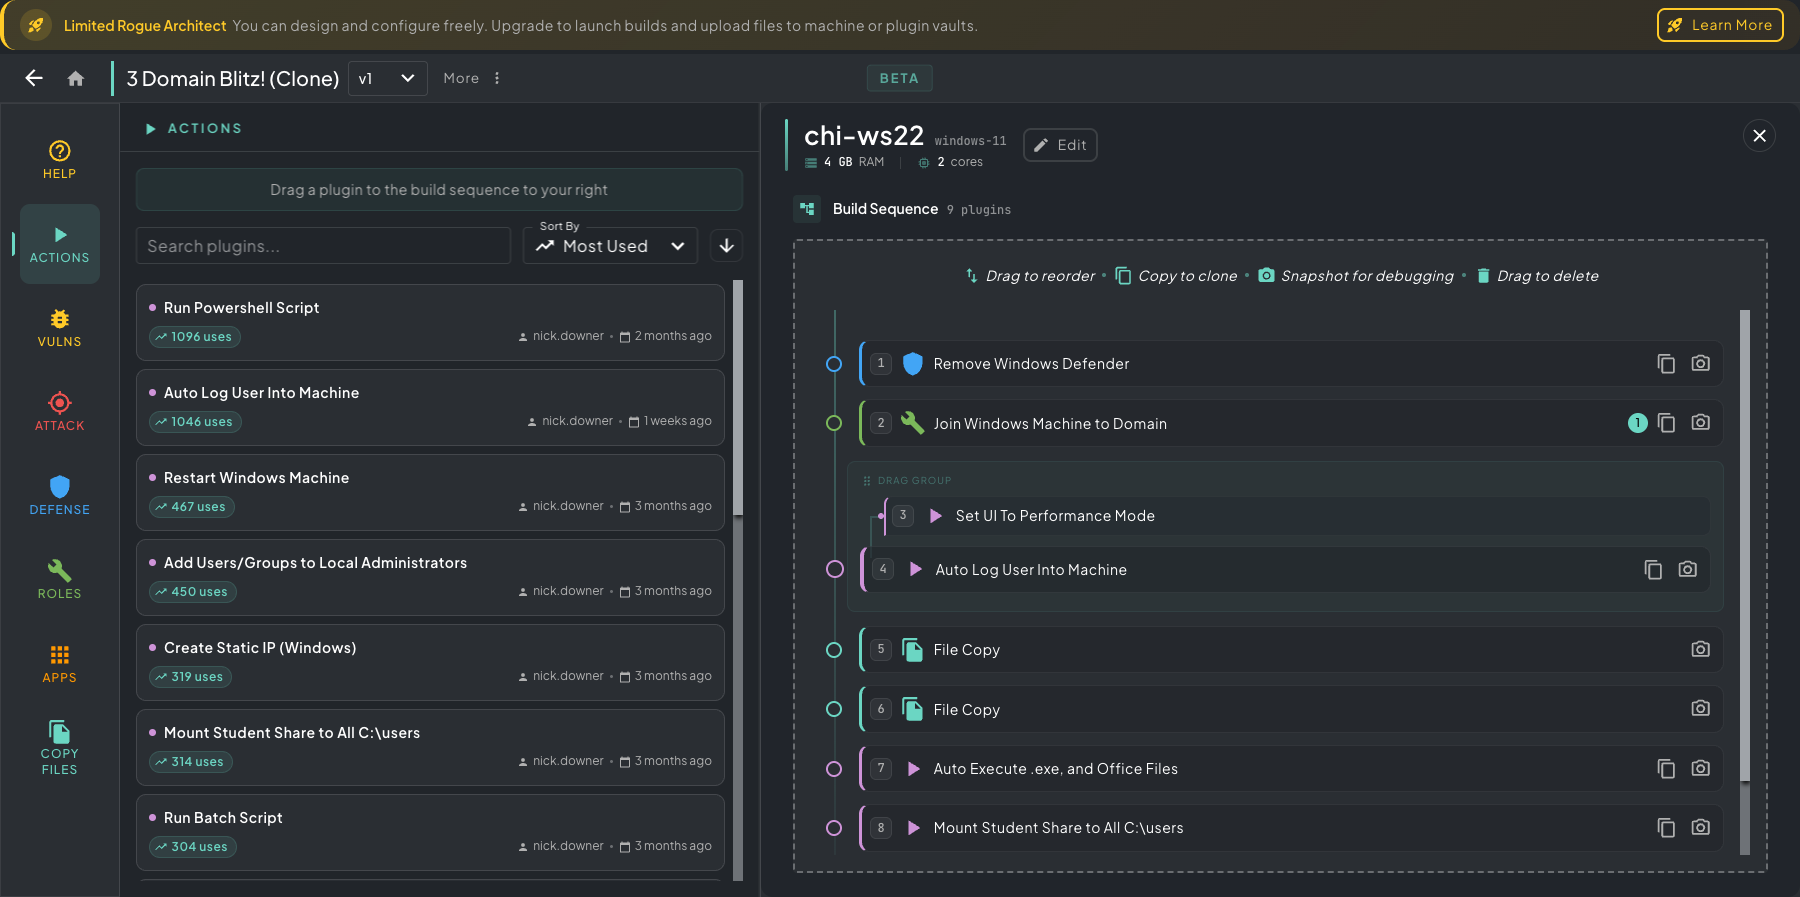 Left sidebar showing the Actions category open — drag any of these tiles onto the machine’s build sequence on the right. Categories are listed down the icon rail (Help, Actions, Vulns, Attack, Defense, Roles, Apps, Copy Files).
| Category | Description |
|---|---|
| Actions | General configuration tasks (domain joins, user creation, network config) |
| Vulnerabilities | Deliberately vulnerable services and misconfigurations |
| Attack | Offensive tools and payloads |
| Defense | Defensive tools, monitoring, and hardening |
| Roles | System roles (Domain Controller, DNS Server, Web Server) |
| Apps | Applications and services |
| Copy Files | File transfer operations from your vault to the machine |
Adding a Plugin
Section titled “Adding a Plugin”- Browse plugin categories in the sidebar, or use the search
- Find the plugin you want
- Drag it from the sidebar onto the build sequence area
- The plugin appears in the machine’s build pipeline
After adding a plugin, the system may run auto-apply automations — plugin-level rules that automatically fill in VLAN or machine configuration based on the plugin’s known requirements.
These are tested baseline sets so you don’t have to guess at resource sizing or networking. Examples:
- Adding a Domain Controller — auto-recommends 2 GB RAM and 2 CPU cores, sets static IP on the VLAN, and configures DNS forwarding back to the DC for that VLAN’s FQDN
- Adding an Elastic server — auto-recommends 12 GB RAM and 2 CPU cores (Elasticsearch is hungry), reserves static IP
- Adding a workstation — auto-recommends 4 GB RAM and 2 CPU cores
You can override any auto-applied value in the machine’s Edit panel — the automations just give you a working baseline so the build doesn’t fall over from underprovisioning on day one.
Plugin Sequence
Section titled “Plugin Sequence”Plugins run top-to-bottom in the order they appear. This is the single most important thing to internalize when building a machine — ordering wrong = a broken build.
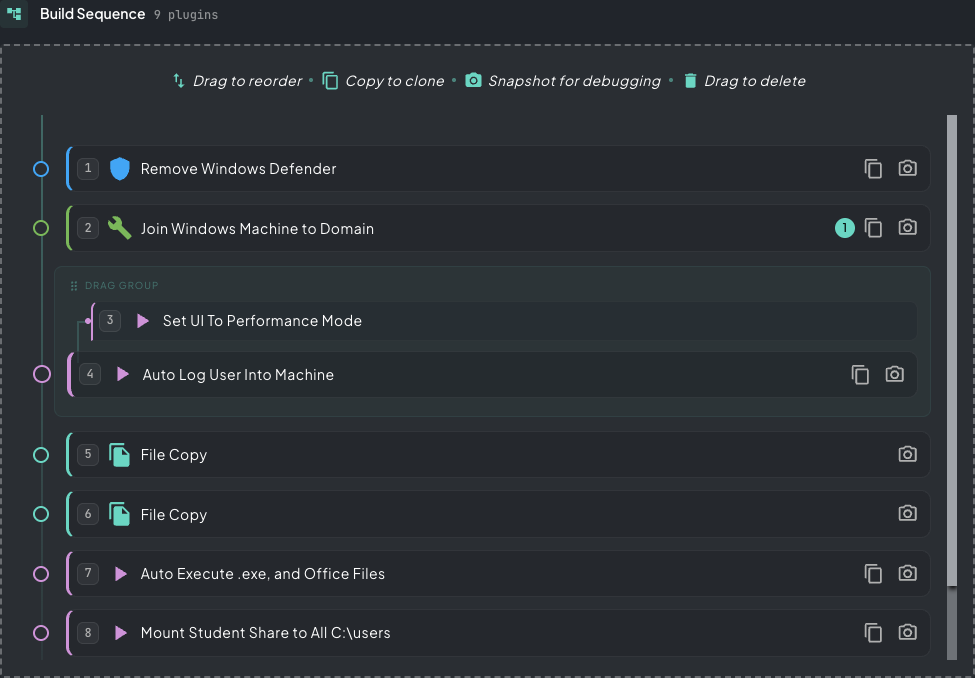 Build sequence on chi-ws22 — Defender comes off first, then the domain join, then the auto-login, then files land on the user’s desktop. Each step depends on the one above it.
A few classic ordering rules:
- Domain Join before Auto Log User Into Machine — the user has to be a domain user before auto-login can pick them up
- Auto Login before File Copy onto the desktop —
C:\Users\<user>\Desktop\only exists once the user profile has been created at first login - Remove Defender before installing attacker tooling — otherwise AV nukes the binaries during install
- Service installs before configuration plugins that depend on them (e.g. install SQL before seeding it with a payload)
Additional tips:
- Reorder by drag — grab any plugin and drop it where it belongs in the sequence; the surrounding items reflow automatically
- Trash on the fly — during a drag, a floating trash can appears; drop a plugin onto it to remove it without leaving the sequence
- Dependency-aware grouping — DRAG GROUPs mark plugin dependencies; if a plugin you add needs prerequisites, Architect auto-pulls them in and groups them so they always move as one unit
File Storage and Copy
Section titled “File Storage and Copy”The Copy Files feature lets you upload arbitrary content to a machine’s vault and then copy it to specific paths during the build. It’s one of the highest-leverage features in Architect for two reasons:
- Push scripts to run on hosts — drop PowerShell, Bash, or batch scripts into the vault, copy them into place, and chain a
Run Powershell Script/Run Bash Scriptplugin to execute them. Custom on-host setup without writing a full plugin. - Seed realistic file content across user profiles — populate Desktop, Documents, Downloads, browser caches, mailboxes, network shares, and any other path you want with believable artifacts. This is the single biggest lever for making a lab feel like a real environment vs. a sterile sandbox.
The flow:
- Upload files and folders to the machine’s unique vault using the Manage Files button
- Drag the Copy Files control from the sidebar into the build sequence
- Click the copy files card to configure source and destination paths
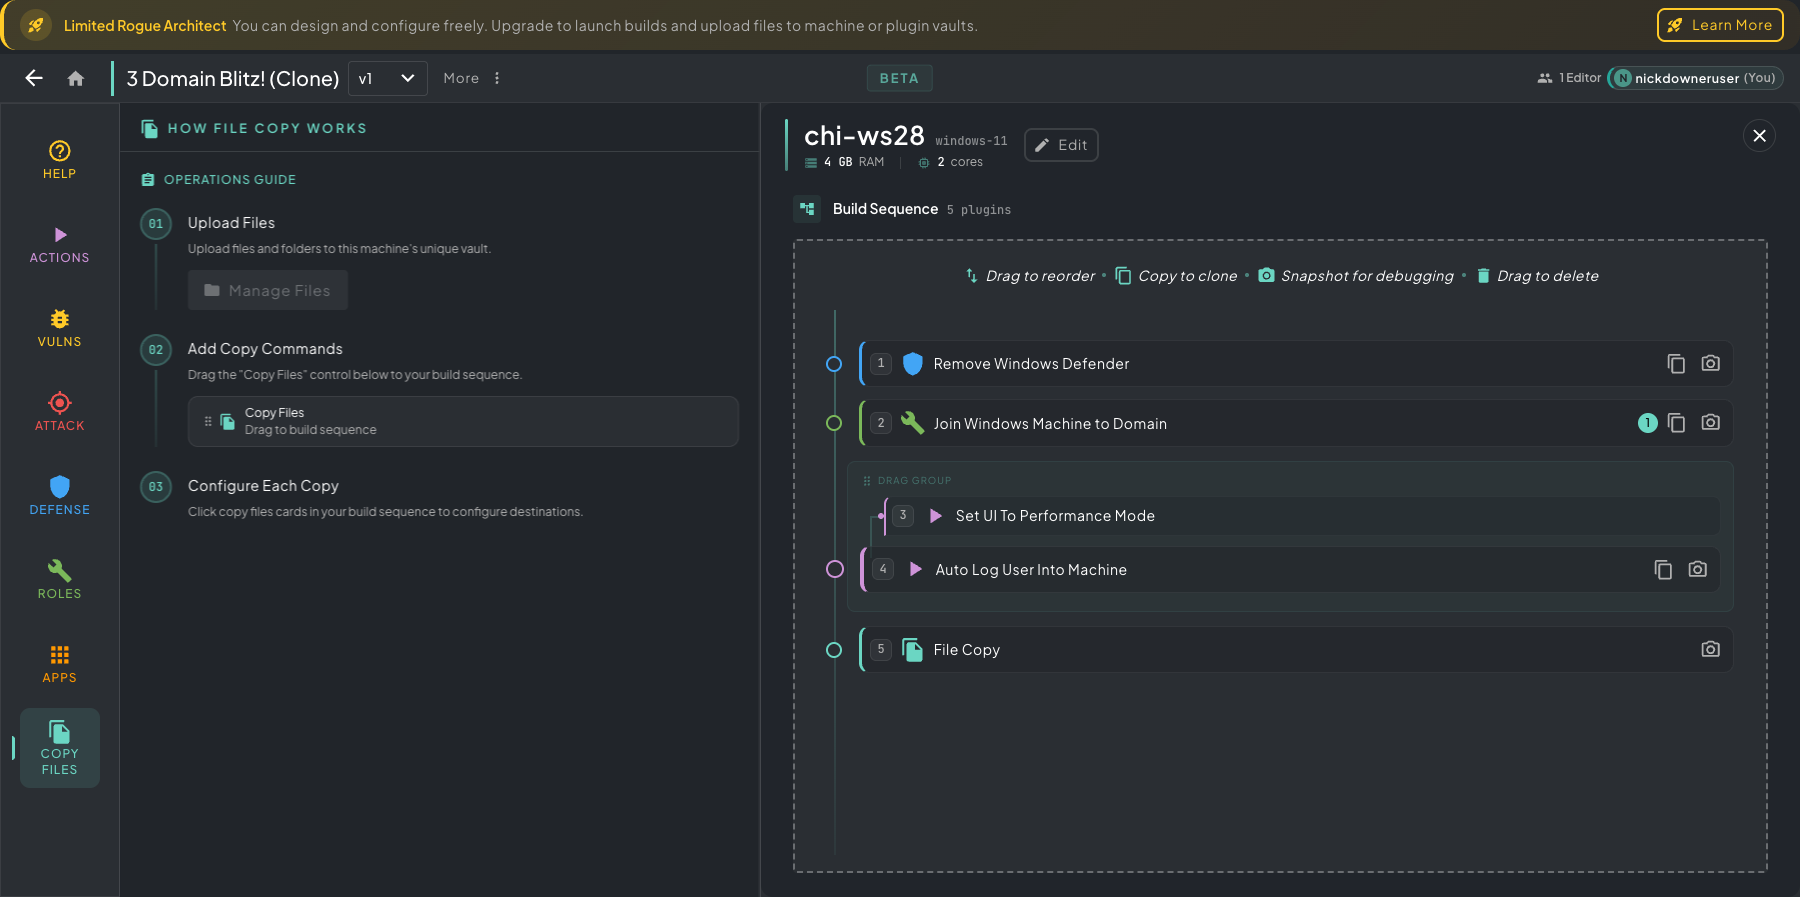 Copy Files panel — Manage Files at the top to upload into the machine vault, then drag the Copy Files tile into the build sequence and click it to set source and destination paths.
Plugin Snapshots
Section titled “Plugin Snapshots”Each plugin in the build sequence has a snapshot toggle (camera icon). When enabled, the build system takes a VM snapshot before executing that plugin. If the plugin fails, you can revert to that snapshot and try again without rebuilding everything from scratch.
The Plugin Browser
Section titled “The Plugin Browser”For a wider view of everything available, open the Plugin Browser from the Rogue Architect home screen. It lists every plugin in your library with search, filtering, and sort controls — useful when you want to browse the full catalog instead of category-by-category from inside a machine.
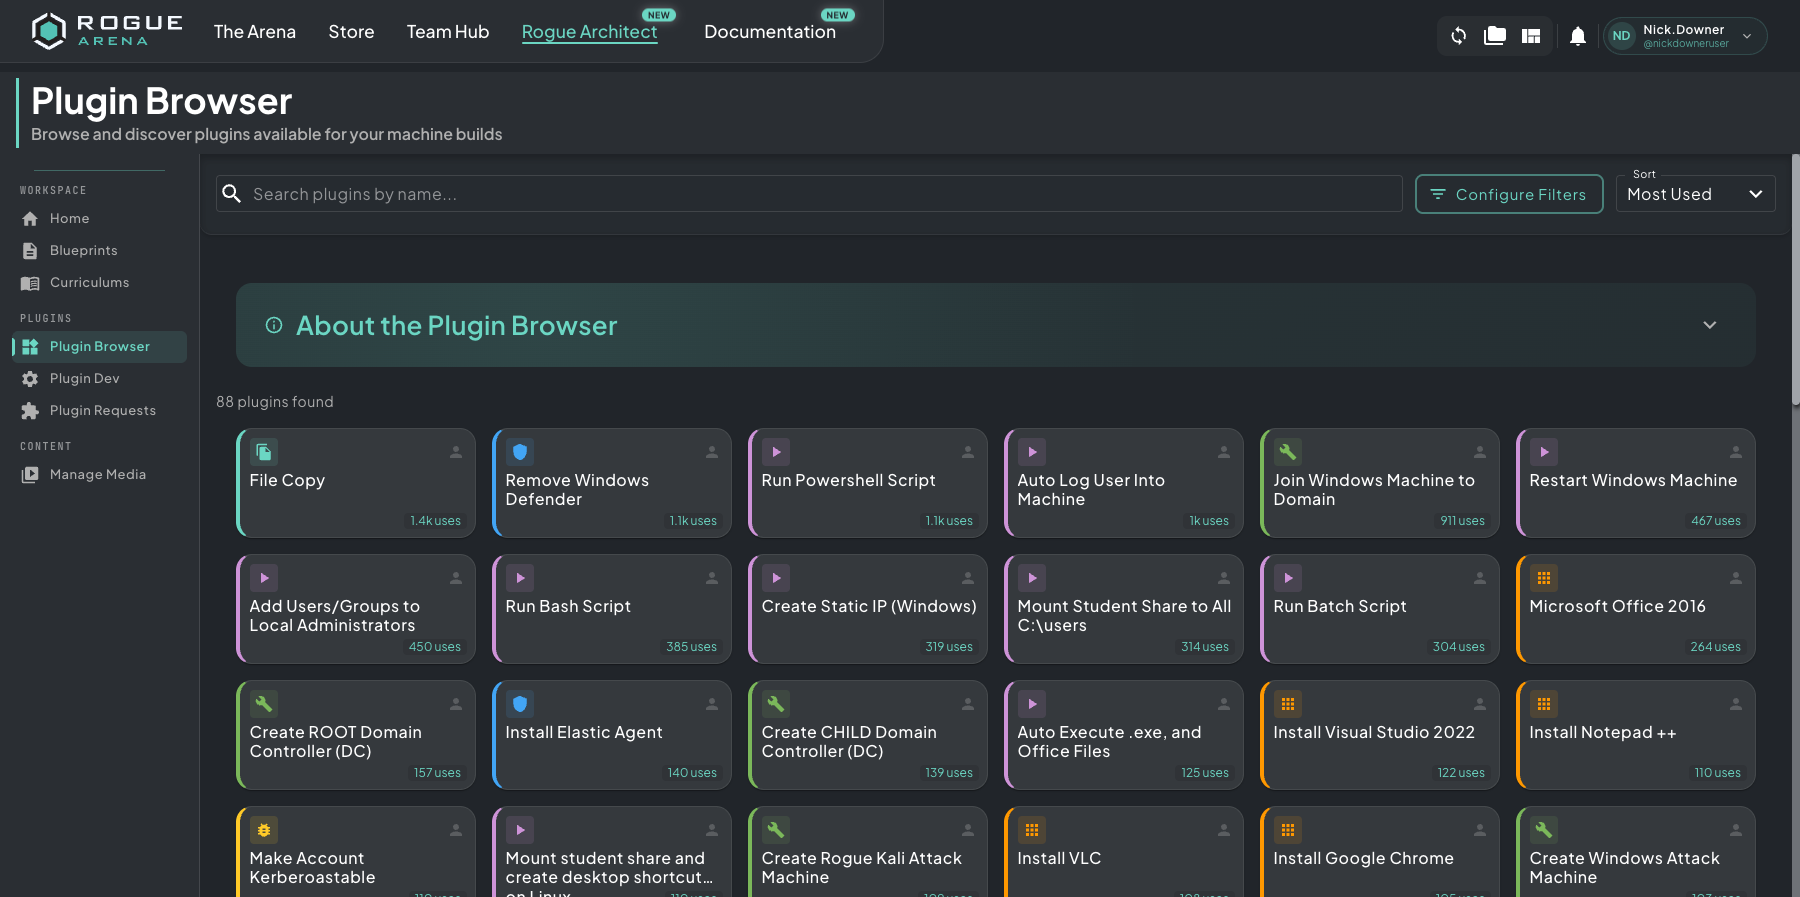 The Plugin Browser — search by name, filter by category/OS/ownership, and sort to find the right plugin across the whole library.
You can drag plugins from the in-machine sidebar in edit mode, but the browser is where you go to discover what’s available before committing to one.
Need a Plugin That Doesn’t Exist?
Section titled “Need a Plugin That Doesn’t Exist?”Two options when the library doesn’t cover what you need — click to learn more:
Have Claude build it
The /rogue-plugin-brainstorm and /rogue-plugin-develop skills walk you through researching the install approach, scaffolding the project, and shipping a working plugin without leaving your terminal.
Build it yourself
Author custom plugins by hand. They appear in the browser and sidebar alongside the built-in ones, fully reusable across every scenario.
Plugin Development